|
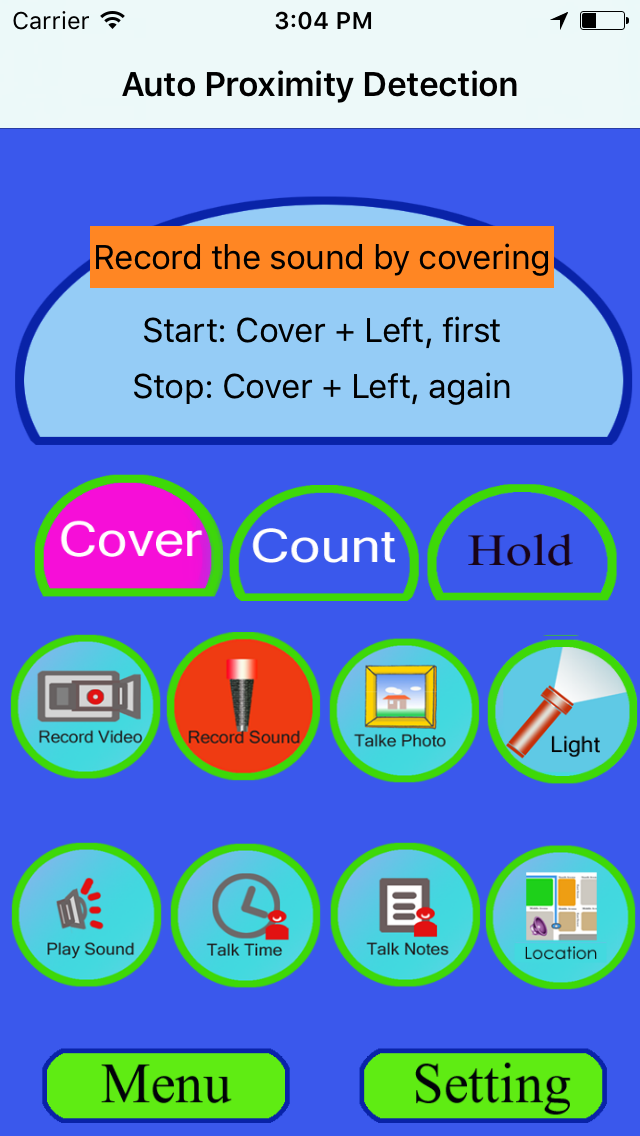
Screenshot
For Auto Proximity Detection
|
 |
| |
|
The main features of iOS Auto Proximity Detection App
|
- Use the proximity sensor of iPhone to
detect the user's instruction
- Include the cover+left detection and
the hold detection
- Could take photos when we cover the
left top corner of iPhone .
- Could record videos when we cover the
left top corner of iPhone .
- Could record sound when we
cover the left top corner of iPhone .
- Could play sound when we cover
the left top corner of iPhone .
- Could talk text notes when we
cover the left top corner of iPhone .
- Could talk current time when we
cover the left top corner of iPhone
|
|
FAQ 1: How to use the App to take photos while
walking?
|
- Step 1: Launch this App.
- Step 2: Confirm that we use the rear
camera.
- Step 3: Confirm already tap the take
photo button.
- Step 4: Select the cover
button.
- Step 5: Start to walk and you two
hands beside your legs, one hand holds the iPhone.
iPhone should be a little away from your clothes.
- Step 6: If you decide to take photo
in front of you, then make the iPhone screen close to
your front clothes. If you want to take photo on your
left side, then make the iPhone screen close to
clothes of your left.If you are using the professional
edition, it could take more than eight photos one by
one according to the default settings.
|
|
FAQ 2: How to use the App to record the video
while moving?
|
- Step 1: Launch this App.
- Step 2: Confirm that we use the rear
camera.
- Step 3: Confirm already tap the
Record Video button.
- Step 4: Select the hold
button.
- Step 5: Start to move and you two
hands beside your legs, one hand holds the iPhone.
iPhone should be a little away from your clothes.
- Step 6:If you decide to record the
video in front of you, then make the iPhone screen
close to your front clothes and do not leave the
iPhone until you want to stop recording.
|
|
FAQ 3: How to use the App to record the sound
while moving?
|
- Step 1: Launch this App.
- Step 2: Confirm already tap the
Record Sound button.
- Step 3: Select the
hold button.
- Step 4: Start to move and you two
hands beside your legs, one hand holds the iPhone.
iPhone should be a little away from your clothes.
- Step 5:If you decide to record the
sound, then make the iPhone screen close to your
clothes and do not leave the iPhone until you want to
stop recording.
|
|
FAQ 4: How to use the App to record the sound
while you are studying in Classroom?
|
- Step 1: Launch this App.
- Step 2: Confirm already tap the
Record Sound button.
- Step 3: Select the cover
button.
- Step 4: Put the iPhone on your desk
- Step 5: If you decide to record the
sound, then put your hand on the top left corner of
the iPhone screen, then left your hand
- Step 6: When you want to stop
recording, just put your hand again on the top left
corner and left.
|
|
FAQ 5: How to export the sound file?
|
- Use the iTune File Sharing feature.
- After we record the sound file, the
sound file will be saved to the local folder of this
App
- When we use the iTune File Sharing,
the local folder of this App will be displayed. So we
could select the sound file and copy to our Mac
computer.
|
|
FAQ 6: How to play the sound while you are using
driving?
|
- Step 1: Put the iPhone on your table.
- Step 2: Launch this App.
- Step 3: Confirm already tap the Play
Sound button.
- Step 4: Select
the cover button.
- Step 5: If you decide to play the
sound, then put your hand on the top left corner of
the iPhone screen, then left your hand
- Step 6: When you want to stop
recording, just put your hand again on the top left
corner and left.
|
|
FAQ 7: How to import your music or sound file?
|
- Use the iTune File Sharing feature.
- Add the existing sound file to this
App local folder
- In this App, in the main view, tap
the menu button at the bottom left corner
- In the menu view,tap the button of
Select a sound file for playing
- In the file list, we could see the
name of the sound file.
|
|
FAQ 8: How to listen the talking of text notes
while you are eating?
|
- Step 1: Put the iPhone on your table.
- Step 2: Launch this App.
- Step 3:Confirm already tap the Talk
Notes button.
- Step 4:Select the cover
button.
- Step 5:If you decide to listen, then
put your hand on the top left corner of the iPhone
screen, then left your hand
- Step 6: When you want to stop
talking, just put your hand again on the top left
corner of screen and left.
|
|
FAQ 9: How to import the text file and add the
text note?
|
- Step 1: Use the iTune File Sharing
feature, add the text file to the local folder of this
App
- Step 2: Launch this App
- Step 3: Confirm already tap the Talk
Notes button
- Step 4: In the menu, tap Talk Notes
button.
- Step 5: In the talking notes view,
tap the import button at the bottom left corner.
- Step 6: In the pop menu, tap the
import from text files item.
|
|
FAQ 10: How do listen the current time report
while walking in the darkness?
|
- Step 1: Launch this App
- Step 2: Confirm already tap the Talk
Time button.
- Step 3: Select the cover
button.
- Step 4: Hold iPhone in hand and start
walking
- Step 5:If you decide to listen the
time report, then put the iPhone close your clothes.
|
|
FAQ 11: How to set the preferences?
|
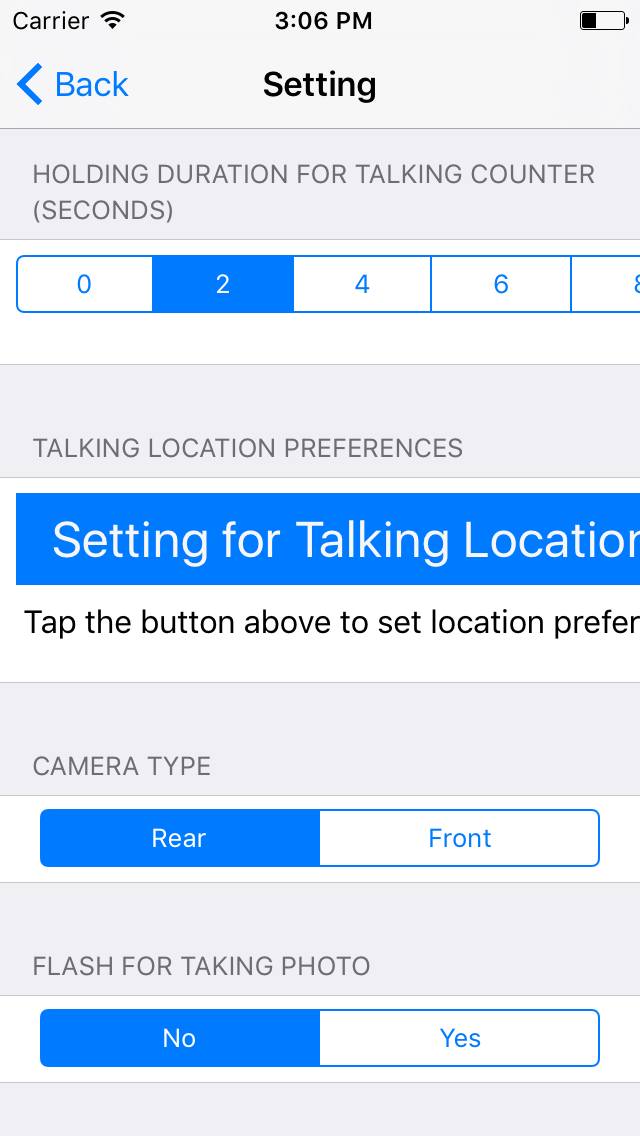
- Step 1: In the main view, at the
bottom of right corner,tap the setting button
- Step 2: The setting view will be
displayed.
- Step 3: In the setting view, we could
set our preferences.
- Step 4: When we need to leave, just
tap the back button, the changes will be saved
automatically.
|
|
FAQ 12: How to add the talking notes?
|
- Step 1: In the main view, at the
bottom of right corner,tap the menu button
- Step 2: In the menu view, tap the
talk notes button.
- Step 3: In the talking notes view,
tap the add button.
- Step 4: In the add view, tap the
bottom right corner, the language list will be
displayed. So we could select the language for the
note.
|
|
FAQ 13: How to rename the sound file?
|
- Step 1: After recording the sound,
the sound file will be saved to the local folder with
the default name. The name includes the date and time
of creating the file.
- Step 2: In the main view, tap the
menu button at the left bottom of the screen.
- Step 3: In the menu view, tap the
Play Sound Files button.
- Step 4: In the sound music file list
view, the name of sound files will be displayed.
- Step 5: In the sound music file list
view, tap the name of sound file, this file will be
selected.
- Step 6: Tap the rename button, the
rename view will be displayed.
|
|
FAQ 14: How to set the camera device and flash for
taking photo?
|
- Step 1: In the main view, tap the
setting button at the left bottom corner, the setting
view will be displayed.
- Step 2: In the setting view, in the
first section, camera type, we could set the camera
device. In the second section, we could set enable or
disable the setting for flash. Only in the rear
camera, the flash setting will be considered.
|
|
FAQ 15: Could set the number of photos when taking
photo?
|
- In the professional edition, We could
set the number of photos when taking photo. Currently,
this feature is only available at the professional
edition. In the standard edition, when we take photo,
once, only one photo will be taken. However, in the
professional edition, when we take photo, once,
several photos will be taken one by one.
- Step 2: In the professional edition,
in the main view, tap the setting button at right
corner. In the setting view, in the third section,
taking photo action, we could set the number of photo.
|
|
FAQ 16: Could set the number of video clips when
recording the video?
|
- In the professional edition, We could
set the number of video clips when recording video.
Currently, this feature is only available at the
professional edition. In the standard edition, when we
record video, once, only one video will be taken.
However, in the professional edition, when we record
the video, once, several video clips will be record
one by one.
- Step 2: In the professional edition,
in the main view, tap the setting button at right
corner. In the setting view, in the five section,
recording video action, we could set the number of
video clips.
|
|
FAQ 17: Could set the number of sound clips when
recording the sound?
|
- In the professional edition, We could
set the number of sound clips when recording sound.
Currently, this feature is only available at the
professional edition. In the standard edition, when we
record sound, once, only one sound will be record.
However, in the professional edition, when we record
the sound, once, several sound clips will be record
one by one.
- Step 2: In the professional edition,
in the main view, tap the setting button at right
corner. In the setting view, in the last section,
sound record action, we could set the number of sound
clips.
|
|
FAQ 18: In the hold action, why the video
recording job cannot stop immediately?
|
- In the hold action, when we record
the video, the iPhone screen will be black. After our
hands already left, the iPhone screen could display
the camera preview but the video recording job still
continue for three or seconds. After that, the video
view will be closed. Because the video action need
some time to finish the job.
|
|
FAQ 19: How could we set the sound setting?
|
- This feature is only available to the professional
edition
- In the main view, tap the setting
button at the bottom right corner in the screen, the
setting will be displayed.
- In the setting view, in the seventh
section, we could set the setting for record sound
files.
- We could set the sample rate of the
sound file, the codec of the sound file and the number
of sound channels.
|
|
FAQ 20: How do we select the languages for the
talking note?
|
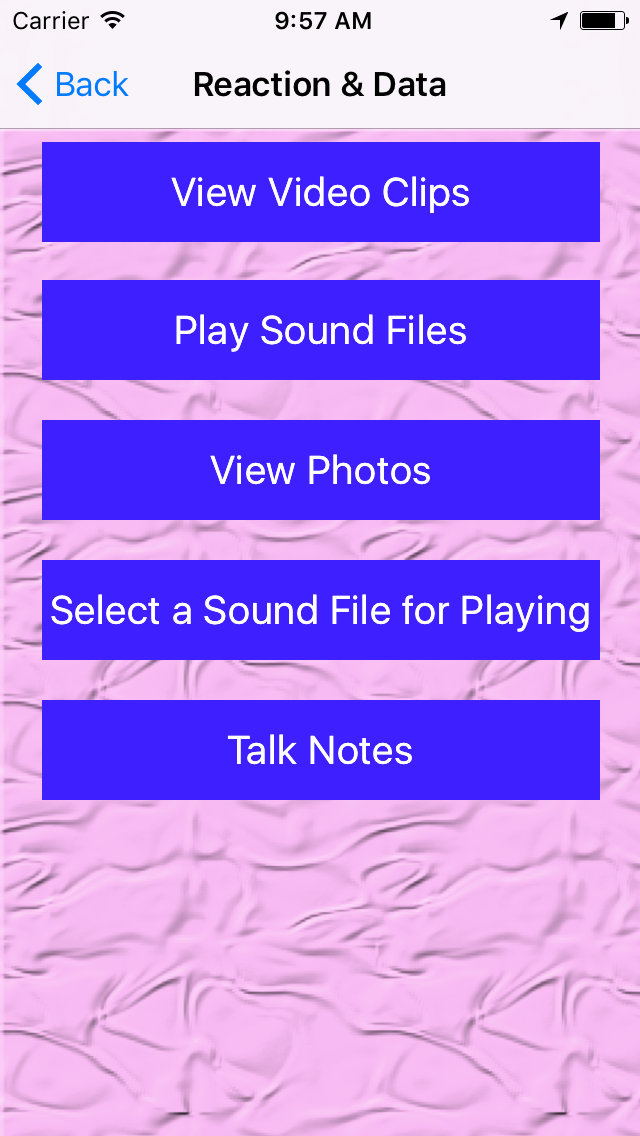
- In the main view, tap the menu button
at the left corner in the screen, the Reaction &
Data menu will be displayed.
- In the menu view, tap the Talk Notes
button
- In the talking notes, tap the single
cell of the table list. The single note view will be
displayed.
- At the bottom right corner, have one
button such as en-US, tap this button, the languages
list will be displayed. Select the language we need,
then just back, the change will be saved
automatically.
|
|
How to
contact with us?
|
- Please contact us by opening the
following contact form.
- You need to fill your official name
in English.
- You need to provide your email
address.
- You need to fill your message in
English in the comment text field.
-
- Open
the Contact Form
|
|
|
|
|
|
|
|